Harvesting Summer’s Sweet Rewards!

Knowing when and how to harvest is an especially important part of growing your own food. Why? Because it affects the quality, flavor, and nutritional value of your homegrown produce! But how do you know when something is fully ripe, and what’s the best way to harvest? Scroll through, and check out our tips on how to harvest popular crops in Colorado.

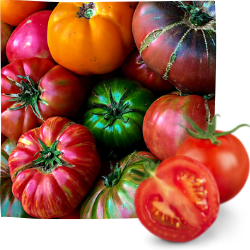
Let’s start with the jewels of the garden — tomatoes! For the best taste and the highest nutritional value, you’ll want to leave your tomatoes on the vine until they’re fully colored, then gently twist and pull from the vine. The trick is in what “fully colored” looks like. Gone are the days when you could wait for a tomato to be a rich, vibrant red before confidently plucking it from the vine.

Nowadays tomato varieties comprise a rainbow of colors — yellows, oranges, greens, stripes, and even sprinkles! It’s particularly important to know what your ripe tomato should look like. If in doubt, a ripe tomato will give slightly to the touch. It it’s not ripe, it will still feel quite hard. Another tell-tale sign is how resistant the tomato is to being picked. If it hangs onto the vine for dear life when you try to pluck it, it’s not ready yet! If you’re growing heirloom varieties, you should pick them just shy of full color because they generally ripen before their color deepens.

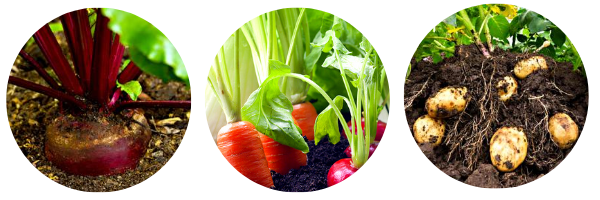
When to Harvest Root Vegetables?

Beets … Most beet varieties are ready to pull about two months from planting. For baby beets, you’ll want to harvest earlier, when the roots are 1½” across. Letting beets stay in the ground too long will yield tough, woody roots!

Carrots … Carrots may be harvest young (at about ½” diameter) for baby roots, or allowed to grow to full size for storage. Not sure if they’re ready to harvest? Pull a few carrots for a quick taste test. If they’re crisp and sweet, they ready to eat. (TIP: loosen the surrounding soil before attempting to pull up a carrot. Carrots are notorious for breaking off when they’re pulled.)

Potatoes … After the potato plants have flowered, you may dig some of the potatoes to enjoy as “new” or “baby” potatoes. If you want to harvest full-sized potatoes, allow the tops to die back in the autumn, then dig up the tubers.

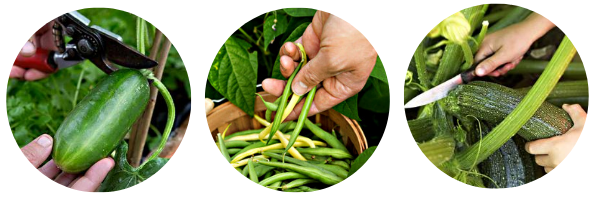
Check These Heavy Producers Daily!

Cucumbers … Harvest when they’re firm and smooth. Check on them often! If they’re left on the vine & become too large, they can become bitter and pithy. Use your garden shears or pruners to neatly clip these from the vine. This will prevent possible damage to the vine caused by twisting or pulling. Cut the stem approximately ¼” above the cucumber.

Green Beans … Pick them when the pod has filled out, but before you can see the seeds bulging. Simply grasp the bean pod firmly up near the top where it connects to the vine, then use your thumb to gently pinch it loose.

Zucchini … There are two things to remember about harvesting zucchini — pick young and pick often! These can quickly become too large. Zucchini is at its most tender and flavorful when it’s about 5″-7″ long and you can easily poke your fingernail through the skin. Use a sharp knife (or your pruners) to cut from the vine. (TIP: you can also harvest those delicious yellow flowers! Enjoy them raw in salads.)

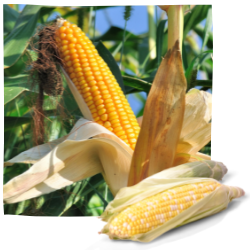
Harvest this summer favorite after the silks become brown and dry. The ear should be completely filled out, and the end should be rounded instead of pointed.

Peppers, Peppers, Peppers

Bell Peppers … These grow in a range of colors including green, red, dark purple, yellow, and orange. In general, they’re ready to harvest when they are the full color of the variety planted. You can harvest bell peppers when they’re green. If you allow them to stay on the vine to ripen further, green peppers may turn red, then orange, then yellow! Purple varieties will turn from green to a dark purple to nearly black. Bells can be eaten at any stage during this ripening process, however the longer you leave them on the plant, the sweeter they become and the higher the Vitamin C content will be. To harvest, use a sharp knife or scissors to cleanly cut peppers from the plant to ensure the least damage to both pepper and plant.

Chile Peppers … Both mild and hot peppers can be harvested when they reach full size and are fully colored. They can also be harvested as soon as they reach a usable size. Chiles can be eaten at just about any stage of development. Mild peppers commonly get sweeter as they mature, while hot peppers get hotter the longer they’re left on the plant. To harvest: cut peppers from the plant with pruners. Leave a short stub of stem attached to the fruit. Do NOT pull peppers from the plant by hand — this can result in broken branches.

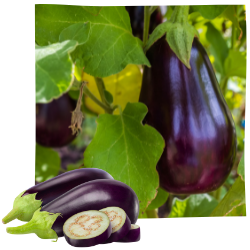
With eggplant, slightly immature & smaller fruits are tastier and will contain less seeds. Eggplants should be firm and shiny when fully ripe. Cut with a knife or pruners rather than trying
to pull from the plant.

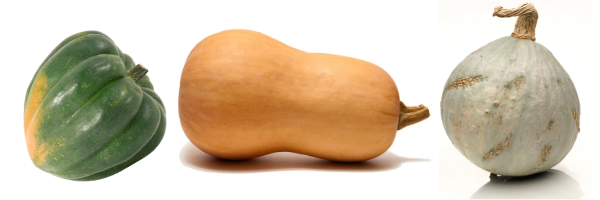
Winter squash … such as acorn, spaghetti, buttercup, butternut, and Hubbard are ready to harvest when you cannot puncture the skin with your thumbnail and the stems are dry and begin to shrivel. Use pruners to cut cleanly from the vine.

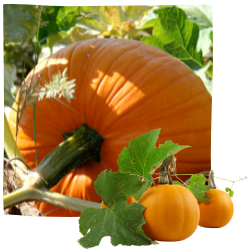
Harvest pumpkins when they’re fully colored and the skin is hard enough to resist a fingernail puncture. They should sound hollow when thumped. Use a sharp knife or pruners to cut the pumpkin from the vine. Leave about 2″ of stem, and handle carefully. Any nicks or bruises will accelerate decay.

After the Harvest
Look for signs of trouble, such as yellowing leaves, rotting fruit, or unwanted pests. Be sure to put any plants that have disease or insect infestations into the trash — not the compost pile!

Healthy plant foliage can go into the compost pile after removing any seed heads. Remove any weeds from the vegetable garden, then improve the soil with compost, or plant a cover crop in the bed to overwinter.

Remember to Share the Harvest
If you find yourself with an overabundance of anything (we’re lookin’ at you, zucchini!) always remember to share the harvest with friends, family, and neighbors. If their cupboards are full, donations of fresh, homegrown vegetables are welcomed at your local food bank! After all, the summer harvest should be a season of plenty for everyone.

Bulb-a-licious

Bulbs are the sentinels of spring. We spend all winter in anxious anticipation of the rainbow of blooms that spring forth from those tiny little bulbs we plant in the fall. Bulbs should be planted now if you plan to enjoy them in spring. They need to go through the winter cold in the ground in order to bloom the following spring. In the world of bulbs, a little planning is required. Those that flower in spring need to be planted in the fall. Those that flower in late summer can be planted in early spring.hoa-ha-lan6-605781-1371470690_500x0


In the snowy month of March, you will see crocus peeking through the snow. Use them in borders of the garden, edging, in the grass, woodlands, and slopes or under trees. The colors range from white, yellow and striped to lavender and deep purple. These bulbs care little about spring snow and insist on flowering regardless of cold temperatures or severe weather. In addition to Crocus the Muscari, Anemone Blanda , and Galanthus bloom early.

crocus

The most popular bulb is the Tulip. We have many different types of tulip bulbs. The tulip has varieties that bloom in March, April and May, depending on the type you choose. Darwin hybrids are well known for their dependable performance, year after year. Tulips look best when planted in groupings of 5 or more bulbs. This will provide you with a patch of bright color that can be fit among existing perennials in the garden. Try planting in larger swaths of color where you might plant a border of annuals. Once the bulbs are done blooming, it will be time to plant your annuals. Your bedding plants will then disguise the bulb foliage while providing your summer garden color.

darwin tulips

Spring just wouldn’t be complete without the ever-dependable Daffodil. They just announce the word Spring with their everlasting beauty. Daffodils are perfect for rock gardens, borders and beds. They are offered in a wide range of colors and shapes and are perfect plant for naturalizing. Daffodil ‘Golden Bells’ is new for 99. Also known as the Yellow Hoop Petticoat, it has as many as 15 stems per bulb. A group of 5 or so will form a carpet of dainty, upward facing bright golden bells in your garden next spring.

www.public-domain-image.com (public domain image)


Feelin’ Hot, Hot, Hot!

It’s mid summer and the heat is on! Some of your plants may be showing signs of heat stress. Leaves may wilt. Vegetables like lettuce and spinach may bolt (flower prematurely) or in the case of plants you want to blossom, like peppers or watermelon, they may drop blossoms, reducing yield. Here are a few tips to help your garden withstand the hottest part of the summer:

1. Watch- Plants will often tell you when they are needing water. Lawns will turn a bluish green and show footprints that don’t rebound. Bean leaves will turn a darker green and begin to wilt. Most plants will perform better if you don’t allow them to wilt before watering, so check your garden every day and observe their needs.

2. Water- It’s true that you need to water more often during hot weather, but first check the soil. The surface may look dry even though there is plenty of moisture in the root zone. Over-watering can be just as harmful as under-watering, so don’t over do it. Slow, deep watering will insure that water soaks down to the roots. Soaker hoses and drip irrigation systems work well. If using a hose that has been laying in the sun, be sure to let it run for a minute or two, until cool water comes out.

3. Mulch- A couple of inches of organic mulch like compost, grass clippings, or bark mulch will help reduce moisture loss and cool the soil temperature. A side benefit is that it prevents most weeds from germinating, too.

4. Shade- Cover cool weather veggies like lettuce and spinach with shade cloth. It won’t totally prevent bolting, but it could delay it a bit. Also, raise your lawn mower blade up so that you have 3 inches of grass left standing after you mow. This will provide shade for the roots of your lawn keeping them cool and much happier (which means a greener lawn).

5. Don’t spray chemicals during heat- Avoid spraying garden chemicals when temperatures are above 85 degrees. Weed killers can volatilize (evaporate and become air borne) and drift onto desirable plants. Insecticides can burn leaves of plants when temps are above 85. Spray early in the morning when temps are cooler and the air is still, or wait

Hail Recovery

Severe hail damage is devastating and discouraging. First of all – take a deep breath and don’t despair. Many times plants will recover from some hail damage, other times there will be no recovery and replanting will be necessary. Here are steps to consider:
• Do a general clean-up of the area and remove the damaged parts of plants – trim off any hanging stems and remove the debris in the area.
• If all that remains are stems, trim them back by half and they will possibly releaf.
• Lightly cultivate the soil around the damaged plants. The force of hail and heavy rain compacts the soil and leaves a hard crusty layer at the surface – gently cultivate to break up the crusty layer.
• Avoid the urge to immediately fertilize the damaged plants. Give them a chance to develop new growth. After a week to 2 weeks fertilize with fish emulsion or seaweed extract. After they have resumed active growth, regular fertilization can resume.

In many instances, hail damage is a Mother Nature “pruning” of the plant. Remember that pruning stimulates growth, and many plants can recover. There will be those that are beyond repair and will have to be replaced.

There are many ways to protect plants from hail to come.  Invert cardboard boxes, buckets or pots, over your plants.  Hail netting is a great way to protect plants.  Use stakes to hold it above the foliage of your plants.  It’s durable and lasts for years.  Because it allows water and sunlight to pass through the netting, it can be left over plant for a time, safely.

Fall Bulbs for Spring Color

072 Muscari Dark Eyes

Planning for continuing color through the season is one of the most challenging aspects of gardening. Planting bulbs in the fall is one of the best ways to begin the succession of bloom that can begin as early February depending on the weather.

086 Nectaroscordum siculumImagine having flowers to admire while winter is still on the calendar. Snowdrops and early crocus are usually the first cheerful reminders that spring is on the way. They are succeeded in the following weeks by many of the other minor bulbs including Iris reticulata, striped squill and the early flowering botanical tulips. For the best display of these early bulbs plant them in groups of 20 to 50.

013 Daffodil Dutch Master

Daffodils and tulips are the focus during the weeks of high spring. There is always room to tuck in new varieties that will provide pleasure for years to come. You will find early, mid-season and late varieties of tulips and daffodils, so be sure to plant some of each. Other spring flowering bulbs to consider are hyacinths, alliums and frittilarias for their unique flowers.

075 Fritillaria persica

The alliums (ornamental onions) will continue flowering into the summer and develop interesting seed heads for additional interest. The Asiatic and oriental lilies are the stars of the summer gardens with their bright, jewel-toned flowers and elegant foliage. As temperatures cool and the colors of fall return the autumn crocus and colchicum bring a surprising finale of rich color to the garden.

Colchicum 2

Iris reticulata Harmony (2)

Bulbs are packages of promise for gardeners. The rewards arrive as each of the packages opens and flowers, each to its season. Plant bulbs this fall for next years color and for future years as well.