When it comes to fall gardening, no plant is more iconic than the garden mum. With their mounded shape, abundant blooms, and rich colors — from deep burgundy to gold, bronze, orange, and creamy white — mums bring the essence of the season to patios, porches, and garden beds. They’re beloved for their versatility and long-lasting color, making them a staple of autumn decorating.
Choosing the Best Mums When shopping for mums, look for plants that are full and well-branched with plenty of buds just beginning to show color.
A plant loaded with tightly closed buds will last longer into the season, giving you weeks of blooms to enjoy. Be sure the foliage looks healthy and green, and avoid plants that are rootbound or appear wilted. At our garden center, our mums are grown right here on-site with plenty of space, which means they’re bigger, bushier, and fresher than trucked-in plants.
Caring for Mums in the Autumn Garden Mums are cool-weather lovers, so they thrive as nights get crisp. Place them in a sunny spot, whether in containers or directly in your garden beds. Keep the soil consistently moist, but not soggy, and be mindful that pots may dry out more quickly than plants in the ground. Deadheading spent blooms and removing faded flowers will encourage fresh ones to open. With just a little care, your mums will continue to shine throughout the season.
Decorating with Mums Garden mums pair beautifully with pumpkins, gourds, cornstalks, and straw bales, making them the perfect finishing touch for autumn displays.
Use them in decorative pots on your porch, cluster them at your entryway for a cheerful welcome, or plant them alongside ornamental grasses and fall pansies for a vibrant seasonal bed. Their bold colors and full blooms bring warmth and charm to any space, instantly creating that cozy fall feeling. It just wouldn’t be autumn without them!
Living in the foothills means enjoying stunning views — while also living with significant wildfire risk. Wildfires are a natural part of Colorado’s varied ecosystems, and creating defensible space around your home is vital to protecting both your home and your community.
FIRE-RESISTANT PLANTS All plants are not equal when it comes to wildfire mitigation. While no plant is truly fireproof, some species are significantly more resistant to ignition and can help slow or alter fire spread. These plants tend to have a low oil or resin content. Instead, their leaves have a high water content giving them an advantage over the high-oil plants (like junipers and conifers) that fuel fires. In fact, a plant’s moisture content is the single most important factor governing its volatility!
Native Colorado species are often a good choice as they are adapted to the local climate and soil conditions.
A compact growth form that stays low to the ground, and plants that are drought tolerant will also tend to be fire resistant.
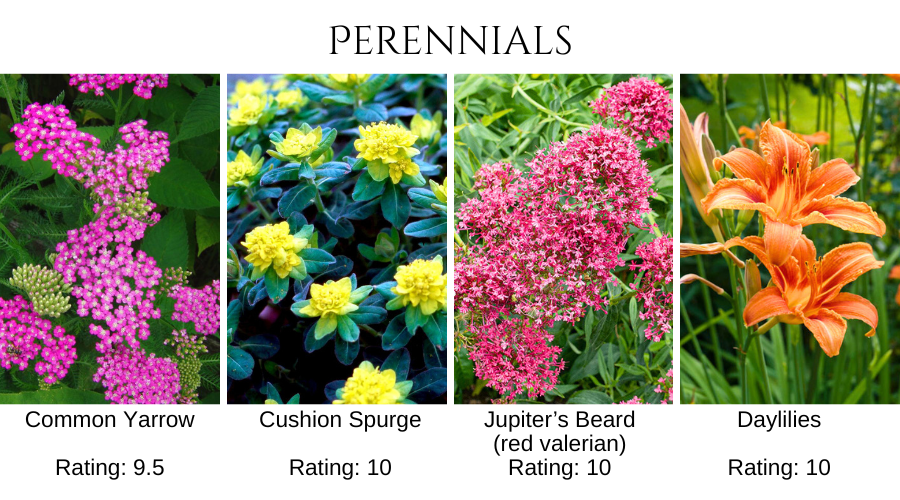
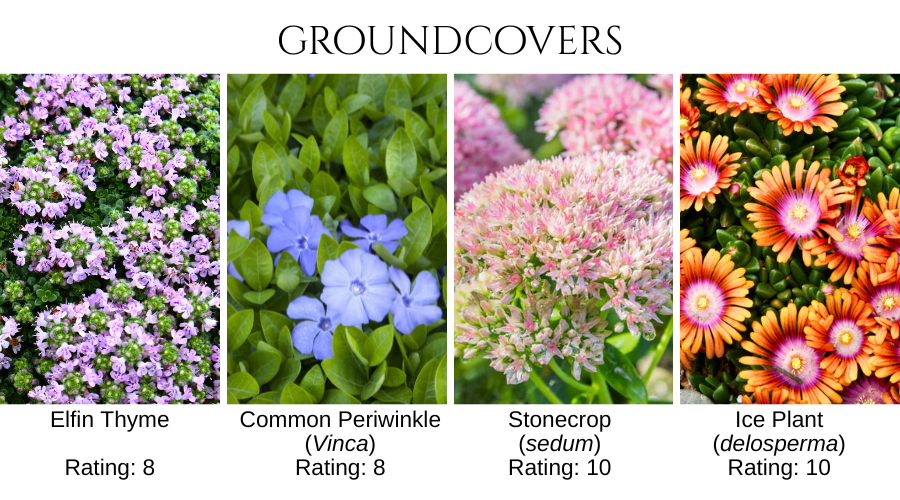
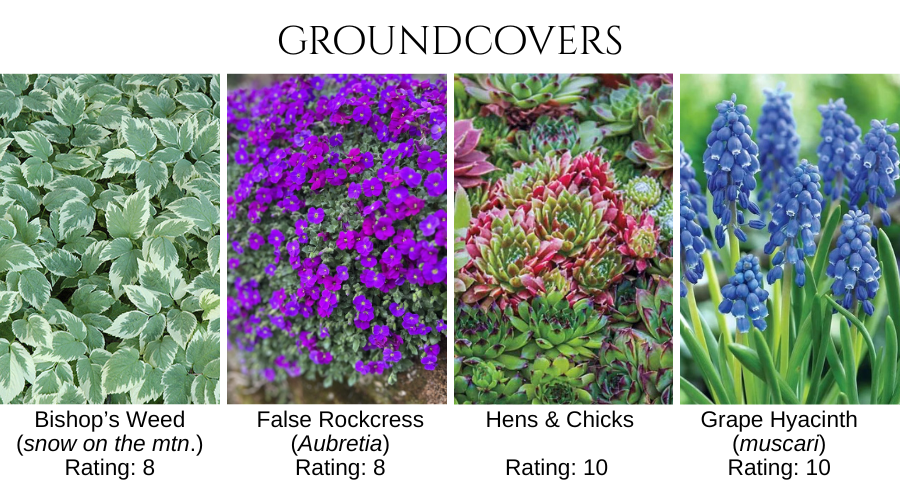
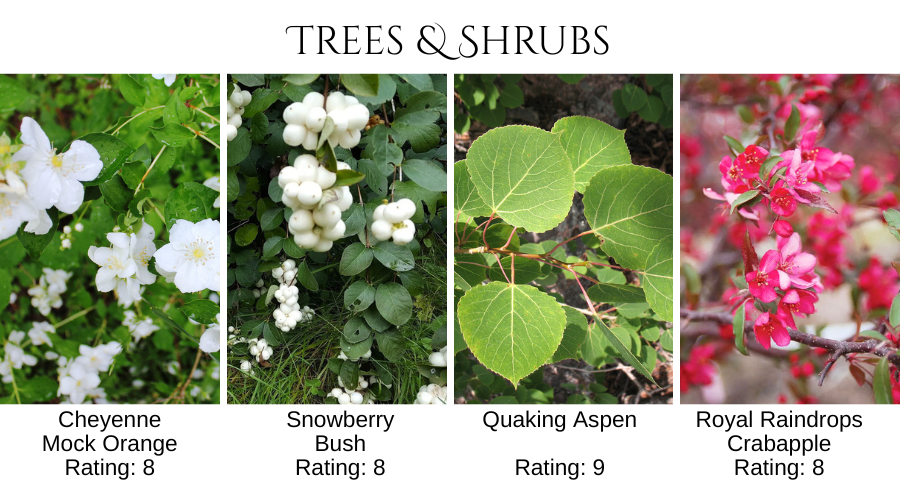
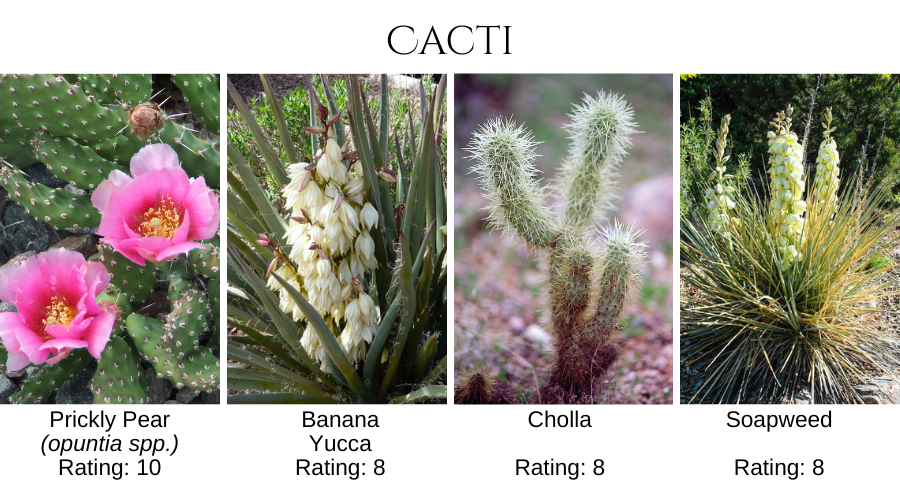
LOW FLAMMABILITY PLANT RATINGS A Colorado State University study has rated plants from 0-10 (based on a methodology developed by Idaho Firewise) to represent their overall flammability. On this scale, plants with lower scores mean they are highly flammable and ignite easily in a wildfire. The most flammable plants have a rating of 0-7, while the least flammable plants have ratings of 8-10.
Smart plant choices are an essential part of reducing wildfire spread and protecting your home.
Choose plants with a flammability rating of 8, 9, or 10 for the defensible space zones closest to your home. Plant choice, spacing and maintenance are critical to reduce the risk adjacent to the structure.
However, low risk doesn’t have to mean low curb appeal! Firewise plants can be a beautiful addition to your landscape. Below is just a sampling of the many plants that are slow to ignite, but quick to add color and interest to your landscape.
Echter’s carries many of CSU’s recommended low-flammability plants. Visit our nursery and perennials areas, or call us (303-424-7979) for availability of plants that interest you. We’ll help you create a beautiful landscape that also serves as a protective barrier against wildfires.
The holiday season is just around the corner, and for many families, that means it’s time to select the centerpiece of holiday décor: the Christmas tree. If you’re considering an artificial tree this year, you’re not alone. Artificial Christmas trees have come a long way, and they now offer an attractive, convenient, and eco-friendly option for bringing festive cheer into your home. Here’s how to choose the right tree for your space and why it might be the best choice over a real tree.
Consider Your Space The first thing to consider when choosing an artificial Christmas tree is the space you have available. Measure the height of your room and the space where the tree will go. If you have a smaller area, such as a hallway or corner, a slim artificial tree could be perfect. These trees are designed to fit in tight spaces while still looking lush and festive. If you have a large living room or an open space with high ceilings, a full-size 9-foot tree will create a beautiful statement.
Choose the Style Our artificial Christmas trees are designed to mimic the natural beauty of real trees like Douglas fir, balsam pine, spruce, and alpine. The type of tree you choose depends on your personal style and the look you want for your holiday décor. If you prefer a fuller tree with soft needles, a Douglas fir replica might be your best bet. For a more rustic, woodsy look, consider a spruce or alpine tree, which has a more open, natural branch structure.
Pre-Lit or Unlit? Artificial trees come in two main options: pre-lit and unlit. Pre-lit trees come with factory-installed lights, which save you the time and effort of stringing lights yourself. They’re especially convenient if you want to set up your tree quickly and enjoy evenly spaced lighting. However, unlit trees give you the freedom to customize the lights to match your theme or color palette each year. If you love experimenting with different light displays or colors, you may prefer an unlit tree.
Durable and Easy to Maintain One of the major advantages of an artificial tree is its durability. A well-made artificial tree, crafted with care, will last for many years, providing holiday cheer season after season. There’s no need to worry about watering the tree or dealing with needles falling onto your floor. Simply unpack it from storage, set it up, and it’s ready to go. This makes it a great option for families with pets or small children.
Why Choose an Artificial Tree? Artificial Christmas trees offer several advantages over real trees: Longevity: With proper care, an artificial tree can last for 10 years or more, making it a cost-effective choice in the long run. Eco-Friendly: Unlike real trees, artificial trees don’t need to be cut down each year, helping reduce the demand for tree farming and transportation. Allergy-Friendly: Some people are allergic to the pollen, mold, or sap found in real trees. An artificial tree eliminates these allergy triggers, allowing everyone to enjoy the holidays sneeze-free. Less Mess: No fallen needles or sap to clean up means more time to relax and enjoy the festive season.
Choosing the perfect artificial Christmas tree involves considering your space, style, and lighting preferences. With so many options available at our garden center, you’re sure to find the tree that suits your home and holiday vision perfectly!
Houseplants are a wonderful addition to any indoor space, bringing life, color, and even improved air quality into our homes. However, like any living organism, plants can face challenges that affect their health and vitality. One of the first signs of trouble usually appears in their leaves. Being attuned to these signals can help you catch and address issues early, ensuring your plant remains healthy and happy. In this blog post, we’ll explore common houseplant problems — such as watering issues, improper lighting, and pests — and how they manifest through the plant’s foliage.
Overwatering One of the most common issues houseplant owners face is overwatering. Plants need water, but too much can lead to a range of problems that typically show up first in the leaves. The most telling sign of overwatering is yellowing leaves. If you notice that your plant’s leaves are turning yellow, especially the lower leaves, it might be an indication that the roots are sitting in waterlogged soil. Overwatered roots can begin to suffocate, causing root rot, which prevents the plant from absorbing nutrients properly.
Other signs include limp, mushy leaves or stems, and sometimes an unpleasant odor from the soil. To prevent overwatering, ensure your pot has proper drainage, and allow the top couple of inches of soil to dry out between waterings. If you suspect overwatering, remove the plant from its pot to inspect the roots. If you find mushy, brown, or black roots, it’s time to prune the damaged roots and repot the plant in fresh, well-draining soil.
Underwatering On the flip side, underwatering is another common culprit behind unhappy foliage. The most noticeable sign of this issue is wilting. If your plant’s leaves appear limp, shriveled, or dry to the touch, it’s likely not receiving enough water. This is particularly common in plants with thin leaves, like ferns, which need consistent moisture.
Crispy leaf edges, browning tips, and curling are also indications of underwatering. Unlike overwatered plants, underwatered plants will often look droopy and feel light when you pick up the pot. The solution here is simple—give the plant a good soak, ensuring that water drains out the bottom. Going forward, try to keep the soil consistently moist without letting it dry out completely between waterings. However, avoid letting the plant sit in water, which could lead to overcompensation and result in overwatering.
Too Much Light Light is essential for a plant’s growth, but too much light can cause damage. One of the key indicators of excessive light exposure is scorched leaves. These leaves will appear faded or washed out in color, sometimes with brown, crispy patches, particularly on the side of the plant facing the light source. If you notice that your plant’s leaves are bleaching or developing burn spots, it’s a good sign that the light is too intense.
Plants that receive too much direct sunlight may also show signs of heat stress, such as curling or drooping leaves. To remedy this, try moving the plant to a spot with indirect light or provide a sheer curtain to diffuse the sunlight. Some plants, like succulents, can tolerate (and even thrive) in bright light, but many houseplants prefer medium to low light conditions.
Not Enough Light Conversely, not enough light can also cause problems. Plants that aren’t getting enough light will often develop pale, yellowish leaves, and growth may become leggy as the plant stretches towards the light source. The leaves may also be smaller and spaced farther apart on the stem, indicating that the plant is not producing enough energy to sustain healthy, compact growth.
If you suspect your plant is suffering from insufficient light, try moving it to a brighter location or consider supplementing with a grow light. Different plants have varying light needs, so make sure you’re providing the right conditions for your specific plant species.
What’s Bugging Your Plant? Pests are another common issue that houseplant owners face, and they often show up on the leaves. Common pests like spider mites, aphids, mealybugs, and scale can cause damage that includes speckled or mottled leaves, sticky residue (from aphid honeydew), and stunted growth. Spider mites, in particular, leave tiny yellow spots or a fine webbing on the undersides of leaves. Mealybugs look like small white cottony masses, often found in leaf joints, while scale insects appear as small brown bumps.
If you notice any of these signs, isolate the plant from others to prevent the pests from spreading. Insecticidal soap, neem oil, or wiping the leaves with rubbing alcohol can often help eliminate infestations, but be persistent—pests can be stubborn.
What Indicates a Happy Plant? On the brighter side, recognizing signs of a healthy, happy plant is equally important. Healthy foliage is typically vibrant and firm, with good color (depending on the species) and no signs of yellowing, browning, or crispness. New growth is another positive sign. If your plant is regularly producing new leaves, it’s a good indication that it’s thriving. Additionally, the leaves will feel supple and strong, with no signs of drooping or wilting.
Plants that are in the right environment—receiving the proper amount of light, water, and nutrients—will grow steadily and without signs of distress. A happy plant will also have healthy roots that are white or light tan in color and firm to the touch.
Your houseplant’s leaves are like its communication system, offering clues about its overall health. By paying close attention to the condition of the leaves, you can quickly spot signs of overwatering, underwatering, light issues, or pests and take action to correct the problem. With a little care and observation, you can keep your houseplants looking lush and vibrant, ensuring they continue to thrive in your home for years to come.
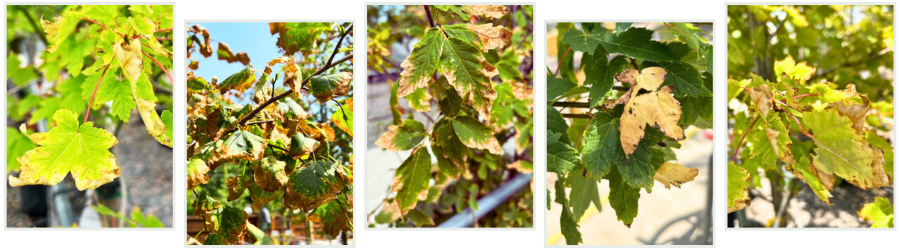
As the heat of the summer starts to wane and the cool breeze of autumn begins to hint at its arrival, many gardeners find themselves drawn to the garden center, seeking new additions to their landscapes. However, one common sight that might give pause is a tree with crispy, dry leaves. While it might seem like a sign of distress, it’s important to understand what causes this condition and why a tree with crispy leaves might still be a great purchase.
Why Do Trees Get Crispy Leaves? In Colorado, our summers can be particularly harsh on trees, especially those that are still in nursery pots. These pots can limit the root system’s access to water, and combined with intense sunlight and high temperatures, it’s no surprise that some trees may develop crispy leaves.
The primary culprit is often water stress. In a pot, even the most diligent watering might not keep up with the tree’s needs during the peak of summer. The roots can only pull from the limited soil available, and if that soil dries out too quickly, the leaves can suffer. However, while crispy leaves may look unattractive, they don’t necessarily indicate a sick tree. In most cases, the tree itself remains healthy and ready to thrive once planted in the ground.
Choosing a Tree in Late Summer When selecting a tree with crispy leaves, it’s essential to look beyond the foliage. Check the trunk and branches for signs of health. The bark should be firm, without any cracks or peeling. Gently scratch a small area of the bark with your fingernail; if you see green beneath, the tree is alive and well. Also, inspect the roots if possible. Healthy roots are white or light brown and flexible, not mushy or brittle.
Late summer and early autumn are excellent times to plant trees in Colorado. The soil is still warm from the summer, which encourages root growth, but the air temperatures are cooler, reducing the stress on the tree. Additionally, many garden centers offer discounts on their remaining stock, allowing you to purchase high-quality trees at a fraction of the cost.
Watering Needs of Newly-Planted Trees Watering is the most critical factor in the success of a newly-planted tree. Once your tree is in the ground, it’s essential to keep the root zone consistently moist. Water deeply, ensuring that the moisture reaches the full depth of the root ball and into the surrounding soil. In the first few weeks after planting, you may need to water every few days, depending on the weather.
As the tree establishes, you can gradually reduce the frequency of watering, but continue to water deeply. In Colorado, it’s also a good idea to water your trees during dry spells in winter. Even when the tree is dormant, its roots need moisture to survive.
Tips for Caring for Your New Tree In addition to proper watering, mulching around the base of the tree can help retain moisture and regulate soil temperature. Apply a 2-3 inch layer of mulch, but keep it a few inches away from the trunk to prevent rot. Pruning is not usually necessary for newly-planted trees unless there are broken or crossing branches. Allow the tree to focus its energy on establishing roots before encouraging new growth.
Advantages of Planting in Early Autumn Planting in early autumn gives your tree the best chance to establish itself before the ground freezes. The cooler temperatures reduce stress, and the tree can focus on root growth without the pressure of supporting a full canopy of leaves. Plus, the discounts available at this time of year mean you can invest in more plants or upgrade to larger specimens without breaking the bank.
So, don’t let a few crispy leaves deter you. With the right care, a late-summer tree can become a thriving, beautiful addition to your landscape. Take advantage of the seasonal discounts and plant your trees with confidence this autumn!
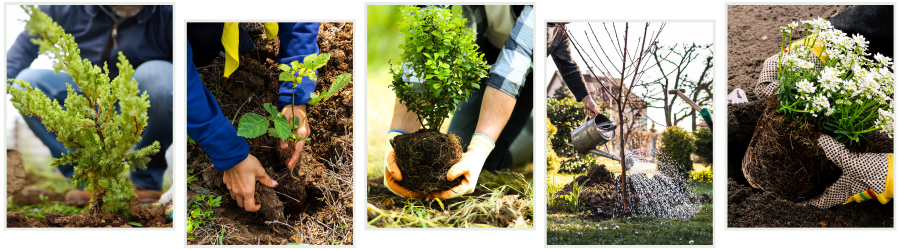
When gardening in a challenging climate like Colorado’s, the timing of planting can impact the success of our gardens. While spring is often hailed as the prime season for gardening, and summer might seem tempting, there’s a quieter, less celebrated time that offers significant advantages: early autumn. Planting trees, shrubs, and perennials in the fall can lead to healthier, more resilient plants, and a garden that’s ready to thrive come spring. Here’s why autumn should be your go-to season for planting.
Cooler Temperatures = Happier Plants Colorado’s summers can be scorching, with temperatures frequently reaching highs that stress plants—especially newly planted ones. In contrast, early autumn brings cooler days and nights, which are much gentler on young roots. This milder weather reduces the risk of transplant shock, allowing plants to establish themselves more comfortably. With the intense heat of summer behind us, your new trees, shrubs, and perennials can focus on root development without the added burden of extreme temperatures.
Extended Root Growth Period One of the most significant advantages of fall planting is the extended period for root growth. In the fall, soil temperatures remain warm enough to encourage root development even as air temperatures drop. This allows plants to develop strong, deep roots before winter sets in. By the time spring arrives, your plants are already well-established and better equipped to handle the growing season’s demands. In contrast, plants set in the ground during summer may struggle to establish roots while also trying to maintain top growth.
Reduced Watering Needs In Colorado, water conservation is always top of mind, and fall planting offers a water-wise solution. Cooler temperatures mean less evaporation and reduced water stress for your plants. Additionally, autumn rains can help provide consistent moisture, reducing the need for supplemental watering. Newly planted trees, shrubs, and perennials will still need regular watering to get established, but the amount required is typically much less than what’s needed during the hot, dry summer months.
Fewer Pests and Diseases Summer gardens are often plagued by pests and diseases, which can make establishing new plants a challenge. However, many of these issues begin to wane as the weather cools in autumn. This reduction in pest and disease pressure means your new plants are less likely to face immediate threats, allowing them to settle in and grow without the need for constant vigilance or treatment. It’s a natural way to give your plants a healthier start.
Enjoy Better Selection at Nurseries While spring and summer might be the busiest time at nurseries, autumn often brings a more curated selection of hardy plants that are well-suited to Colorado’s climate. Many nurseries, like ours, offer sales or discounts as they clear out inventory before winter, so you might find high-quality trees, shrubs, and perennials at a great price. Plus, with fewer customers around, you’ll have more time to browse and get advice from knowledgeable staff without feeling rushed.
Get a Head Start on Spring By planting in the fall, you’re essentially giving your garden a head start on the next growing season. Come spring, when everyone else is just starting to dig, your fall-planted trees, shrubs, and perennials will already be settled, ready to burst into growth and bloom. This can lead to earlier flowering, stronger plants, and a garden that looks more mature and vibrant from the get-go.
If you’re looking to create a resilient, thriving garden in Colorado, consider making early autumn your prime planting season. The cooler temperatures, extended root growth period, reduced watering needs, fewer pests, and the chance to get a head start on spring all make fall an excellent time to invest in your garden’s future. So, as summer winds down, don’t pack away your gardening tools just yet—embrace the benefits of autumn planting, and watch your garden flourish.
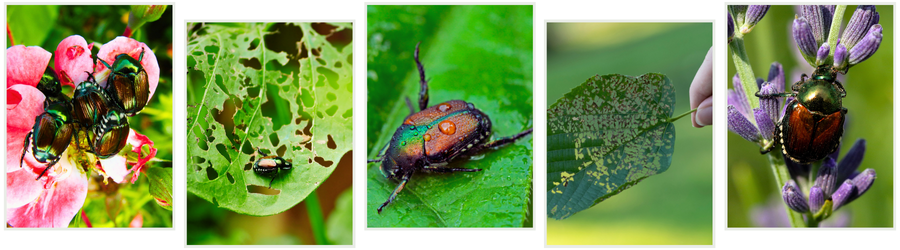
If you’re a gardener in Colorado, chances are you’ve encountered the voracious appetite of Japanese beetles wreaking havoc on your plants. These metallic green and copper-colored pests are more than just a nuisance. They can quickly decimate a garden if left unchecked. Let’s dive into what makes these beetles such a challenge for gardeners and how you can manage them effectively.
Identifying Japanese Beetles Japanese beetles (Popillia japonica) are easily recognizable by their distinctive coloring: metallic green bodies with copper-brown wing covers. They are about half an inch long and have small white tufts of hair along their sides, which can sometimes resemble spots.
You’ll often find them congregating in groups on plants, particularly those with large leaves like roses, linden trees, and grapes.
Damage Caused by Japanese Beetles These beetles are not picky eaters — they’re indiscriminate feeders. Their known diet includes over 300 plants. They chew through leaves, flowers, and even fruits, leaving behind skeletonized foliage that can quickly turn your once-vibrant garden into a ragged mess. Their feeding habits can weaken plants and make them more susceptible to other stressors, potentially leading to plant death in severe infestations.
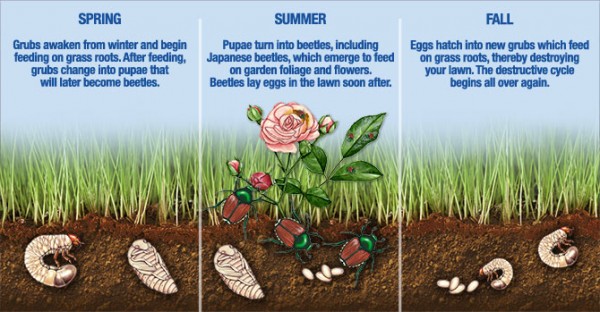
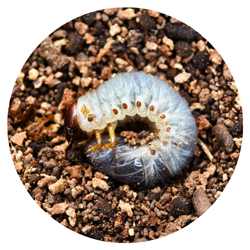
Life Cycle of Japanese Beetles Understanding the life cycle of Japanese beetles is crucial for effective management. They have a one-year life cycle that begins with eggs laid in the soil during mid-summer. These eggs hatch into grubs that feed on grass roots, causing damage to lawns and other grassy areas. By late spring of the following year, the grubs pupate and emerge as adult beetles, typically around June in Colorado.
Grub Stage Damage: Grubs feed on grassroots, which can lead to brown patches in lawns and weakened turf that easily pulls up like a loose carpet. Adult Stage Damage: Adult beetles emerge and feed on foliage, flowers, and fruits, causing visible damage within days.
Protecting Your Landscape Managing Japanese beetles requires a multi-pronged approach that addresses the damage they cause at each stage of their life cycle.
In the grub stage
Beetles will be burrowed into your lawn. There are a number of products available that target grubs in lawns and have proven to be effective against Japanese Beetles.
Products like Milky Spore (a bacterial disease of grubs), beneficial nematodes (parasitic organisms that target grubs), and grub control products such as GrubGONE! or GrubEX! can help reduce grub populations in the soil without harming beneficial insects.
Milky Spore (Paenibacillus popillae) is an organic product that is easy to use and will protect your landscape for the next ten years. It is a spore that affects Japanese Beetle grubs and nothing else! Yes, you read that right. It will not harm anything else in your garden. That means it can safely be used in the lawn, in the vegetable garden, and throughout your landscape. (Note: Expect this product to develop over time. It takes 3-4 years to build up enough of the spore disease to be noticeably effective)
Beneficial Nematodes (Heterorhabditis bacteriophora) seek out and kill all stages of harmful soil-dwelling insects — including Japanese Beetles. They are tiny worms found in soil that target young stages of pest insects, like larvae, grubs, nymphs, and pupae. They are a natural and effective alternative to chemical pesticides, and have no detrimental effect on non-target species such as ladybugs, earthworms and other helpful garden insects. Releasing the nematodes into your garden is a simple process. They are sold in an easy-release powder that dissolves quickly with water. For application, you can opt for a standard watering can or use a hose-end sprayer or pump sprayer to apply.
GrubGONE! is a natural and effective product with the main ingredient being Btg (Bacillus thuringiensis galleriae). Commonly found in nature, these bacteria can live and multiply within the bodies of insects, and produce spores and protein crystal toxins which can result in death of the insect host. It is a granular which should be applied in the spring, and then again in mid- to late summer when adult beetles will re-enter the turf to lay eggs and overwinter.
GrubEX! is a granular pesticide (Chlorantraniliprole 0.08%) that should be applied in spring or early summer. A single application can prevent grubs of all kinds from damaging your lawn all season long, especially killing the Japanese Beetle larvae (grubs) so they never get the chance to develop into adults.
In the adult beetle stage
Japanese beetles will be actively flying and feeding on plant material in your landscape. A number of strategies can be employed to mitigate damage and get rid of the adult beetles.
Handpicking adult beetles can sometimes be effectively employed in small plantings. The beetles are easily picked or dislodged; shaking infested plants over a collecting container in early morning when temperatures are cool can be particularly productive. It is best to physically remove them from your plants with a gloved hand, but don’t squish them! Squished bugs emit pheromones, which end up attracting more beetles. Take the captured beetles and toss them in a bucket of soapy water.
BeetleGONE! is the first Bacillus thuringiensis galleriae (Btg) bio-insecticide to control adult beetles (plus the larvae or turf grubs) at a level of efficacy equivalent to chemical standards, but without the side effects or off-target damage to beneficial insects and pollinators. Unlike other biological or chemical grub-control products, BeetleGONE! can be used as a curative treatment for grub control as well as a preventative treatment. It works by making the foliage inedible to the beetles. This is a powder that you mix with water to apply. (Should be reapplied every 7-10 days)
Beetle traps, which use pheromones to attract beetles into a bag or container, can be controversial. While they can capture large numbers of beetles, they might also attract more beetles to your yard. If you choose to use traps, place them at least 30 feet away from your garden to draw beetles away from rather than into your plants.
Dealing with Japanese beetles requires vigilance and a strategic approach. By understanding their life cycle, identifying their damage, and employing a combination of cultural, biological, and if necessary, chemical controls, you can protect your garden from these invasive pests. Experiment with different methods to find what works best for your specific garden environment and remember to always follow product instructions carefully.
By taking proactive steps, being persistent, and staying informed, you can keep your garden thriving and beautiful, even in the face of challenges posed by Japanese beetles.
For a more detailed look at Japanese Beetles and possible controls, check out this informative fact sheet from the Colorado State University Extension: Japanese Beetle Fact Sheet by Dr. Whitney Cranshaw
They’re furry, they’re cute, and in the garden … they’re a real problem! These critters can be one of a gardener’s most despised pests, capable of wiping out entire crops overnight. They seem to have an insatiable appetite for young, tender shoots and leaves, which makes a vegetable garden one of their favorite targets.
Rabbits are attracted to a wide variety of plants, especially in the early spring when tender new growth is abundant. They can quickly decimate rows of lettuce, spinach, carrots, and they’ll even nibble on fruiting plants like tomatoes and peppers. Their feeding habits not only stunt plant growth but can also leave plants vulnerable to diseases and pests.
Protecting your vegetable garden from rabbit damage requires a combination of strategies tailored to your specific garden layout and local rabbit population. While physical barriers like fencing are among the most effective methods, integrating natural repellents, strategic planting, and vigilant maintenance can significantly enhance your garden’s defenses against these persistent pests.
SIGNS OF RABBITS IN THE GARDEN If you suspect these furry marauders may be visiting your garden, there are a few ways to detect their presence. If you see your plants completely disappear overnight — especially when they’re young tender shoots such as peas, Swiss chard, or pepper seedlings — it’s a pretty good bet that rabbits are responsible. Look for their pea-sized droppings, tufts of hair on fences, and spots that look like a small animal may have been digging. You’ll find plant damage that looks like it’s been trimmed with pruners rather than nibbled or chewed. Rabbits have both upper and lower incisors, so when they feed, they create a clean cut.
There are a number of strategies that can be employed to discourage rabbits and make your veggie garden a much less attractive buffet option. Many gardeners have found one, or a combination of several, of the strategies below worked for them.
CREATING PHYSICAL BARRIERS One of the most reliable and effective ways to protect your vegetable garden from rabbits is by using physical barriers like fencing.
A sturdy fence around your garden perimeter, preferably made of hardware cloth or chicken wire with holes no larger than 1 inch, can effectively keep rabbits out. Make sure the fence is at least 2 feet high to keep rabbits from jumping over, and you’ll need to extend fencing at least 6 inches below ground to prevent them from burrowing under.
For individual plants or smaller areas, construct barriers from chicken wire or hardware cloth to form cylinders around each plant. Planting small crops like lettuce in a hanging basket is another creative way to put them safely out of reach of the local rabbit population.
Raised beds (if they’re at least 2 feet high) can be another effective way to lift enticing plants off the ground and keep them out of sight and out of reach for rabbits.
TRY INTIMIDATING OBJECTS Rabbits may feel less welcome in your garden if they think there are predators nearby. Try placing artificial snakes or owls within sight of favorite vegetable crops to discourage rabbits.
Moving objects like pinwheels may help deter a rabbit. Try motion activated sprinklers that will spray when rabbits hop by. Whatever objects you try, be sure to move them around to different places in the garden now and then, or swap them out for new and unfamiliar objects.
SMART GARDEN DESIGN & PLANT SELECTION Another helpful strategy is to plan your garden with rabbit-resistant plants in mind. While no plant is completely rabbit-proof, some are far less appealing to rabbits than others. Try interplanting susceptible crops with more rabbit-resistant plants to confuse their noses and discourage them from feasting on your prized vegetables.
Rabbits will tend to stay away from plants that have a pungent scent, so planting highly-aromatic herbs such as rosemary, mint, thyme, and sage will act as a deterrent. The same is true for anything in the onion family: chives, onions, garlic, allium, etc., tend to act as a natural repellent.
TRY RABBIT REPELLENTS Some gardeners swear by repellents to deter rabbits. Rabbit repellents work either by releasing an unpleasant odor or by making desirable plants taste bad.
I Must Garden’s rabbit repellent is a spray which combines both of these strategies, and is biodegradable and completely safe for people, pets, and the environment. Bonide’s Go Away Deer & Rabbit Repellent works by using strong scents combined with white pepper (rabbits don’t like anything spicy!) which works as an irritant without causing harm.
While these methods can be effective, they will need to be reapplied after rain or irrigation, and their effectiveness can vary based on local rabbit populations. It’s always a good idea to alternate repellents so that rabbits do not get used to any scent or flavor. Rabbits do most of their feeding in the evening and into the night, so to be most effective, you’ll want to apply deterrents at the end of the day.
MAINTENANCE AND MONITORING Regular garden maintenance is crucial in deterring rabbits. Keep your garden tidy by removing weeds, tall grasses, and any debris where rabbits might hide or nest. Check your fences and barriers regularly for any signs of damage or places where rabbits might be able to squeeze through.
By implementing these strategies and staying proactive throughout the growing season, you can enjoy a bountiful harvest of vegetables without sharing it all with the local rabbit population.
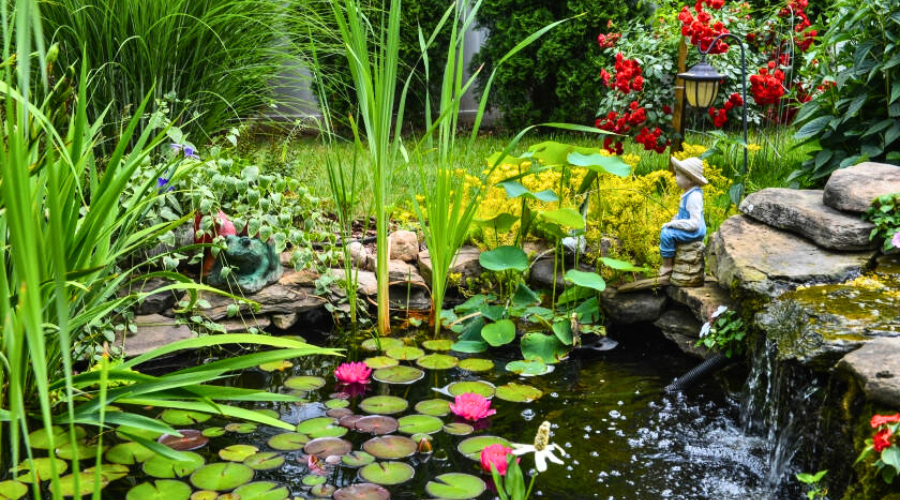
Creating a beautiful and thriving water garden involves more than just placing plants in water — it’s about understanding the roles each type of aquatic plant plays in maintaining a balanced pond ecosystem. Whether you’re a seasoned gardener or just starting out, understanding the different types of water plants and their roles can significantly enhance your pond’s health and beauty.
There are three main categories of aquatic plants: submerged, emergent, and floating. Each plays a vital role in maintaining water quality and supporting aquatic life. Incorporating a variety of these different types of plants not only enhances the visual appeal of your water garden but also plays a crucial role in maintaining its health. They are your allies in achieving a balanced and beautiful water garden. The key to a successful aquatic garden lies in understanding and harnessing the natural benefits of each type of aquatic plant.
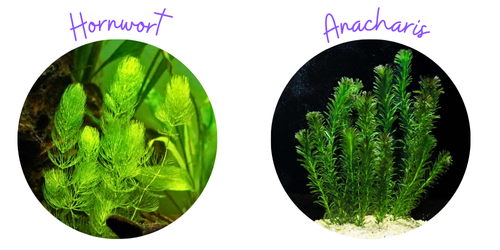
Submerged Plants: Oxygenating Powerhouses
Submerged plants play a crucial role in maintaining water clarity and quality by oxygenating. They grow entirely underwater, with their leaves and stems providing habitats for aquatic organisms. These plants not only oxygenate the water but also absorb excess nutrients, helping to prevent algae overgrowth.
Examples include Anacharis(Egeria densa) a popular choice for its rapid growth and ability to absorb excess nutrients; and Hornwort (Ceratophyllum demersum) known for its bushy appearance and effective nutrient uptake.
Emergent Plants: Nature’s Filtration System
Emergent plants grow with their roots underwater but their stems and foliage above the water surface. They play a crucial role in providing habitat, shade, and filtration. Their upright growth adds vertical interest to your pond and offers shelter for fish and amphibians.
Popular choices for emergent pond plants include Water Lilies(Nymphaea spp.), famous for their beautiful blooms and large floating leaves that provide shade and habitat for aquatic creatures. Pickerel Weed(Pontederia cordata) features spikes of blue flowers above glossy green leaves and is ideal for shallow areas of the pond.
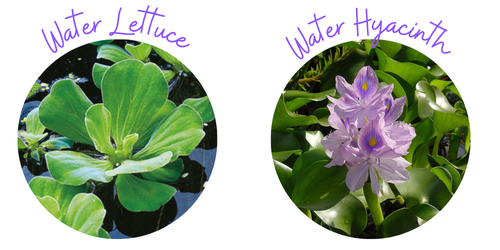
Floating Plants: Shade and Nutrient Control
Floating plants rest on the water’s surface without being anchored to the pond bed. They are excellent natural filters, shading the water and reducing sunlight penetration, which helps control algae growth. These plants are also prized for their ability to quickly cover the surface, reducing evaporation and providing hiding places for fish.
Water Hyacinth(Eichhornia crassipes) and Water Lettuce(Pistia stratiotes) are both popular choices. Water Hyacinths are admired for their exquisite colorful blooms and broad leaves, while Water Lettuce forms dense mats of bright green that provide shade and shelter for fish.
When selecting aquatic plants, consider the specific conditions of your pond—such as water depth, sunlight exposure, and desired aesthetic—and choose plants accordingly. With proper planning and maintenance, your aquatic garden will flourish, providing enjoyment for both you and the diverse aquatic life it supports.
Orchids have long captivated the hearts of gardeners and plant enthusiasts alike with their stunning diversity and unique characteristics. Originating from diverse habitats such as tropical rainforests, temperate regions, and even deserts, orchids are known for their intricate blooms and often delicate appearances. Despite their reputation for being finicky, many orchids can thrive with the right care and attention, making them a rewarding addition to any indoor garden.
Why Orchids Are Special Orchids have earned their reputation as special plants not only for their exquisite beauty but also for their remarkable adaptations to diverse environments. Their ability to thrive in various ecosystems, from humid rainforests to arid deserts, showcases their resilience and evolutionary sophistication. Orchids have developed unique relationships with pollinators, often relying on specific insects or birds for pollination, which adds to their ecological significance.
When you visit our garden center, you’re likely to find several different kinds of orchids available. By learning about the unique characteristics of different orchid types such as Cattleya, Dendrobium, Miltonia, Oncidium, and Paphiopedilum, you can better cater to their individual requirements and enjoy the rewards of their spectacular blooms.
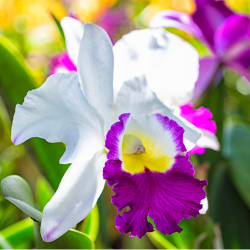
Cattleya Orchids: Queen of Orchids
Cattleya orchids, often referred to as the “Queen of Orchids,” are celebrated for their large, showy flowers and delightful fragrance. Native to Central and South America, these orchids prefer bright, indirect light and a well-draining potting medium. They are popular among orchid enthusiasts for their vibrant colors and the striking appearance of their blooms, which can last for several weeks under optimal conditions.
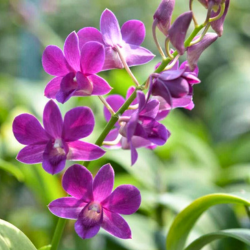
Dendrobium Orchids: Diverse and Adaptable
Dendrobium orchids are one of the largest genera in the orchid family, encompassing a wide range of species and hybrids. They originate from various regions including Asia, Australia, and the Pacific Islands. Dendrobiums are known for their cane-like pseudobulbs and clusters of flowers that bloom along the length of the stems. These orchids thrive in bright, indirect light and require regular watering during their active growth periods.
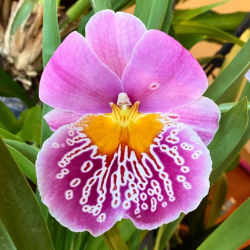
Miltonia Orchids: Graceful and Fragrant
Miltonia orchids, often called “Pansy Orchids,” are admired for their elegant, pansy-like flowers and delicate fragrance. Native to the cloud forests of Brazil and neighboring countries, Miltonias prefer moderate light and humidity levels. They are characterized by their long, arching flower spikes that bear multiple blooms. These orchids benefit from consistent moisture and good air circulation to prevent fungal issues.
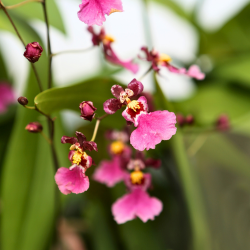
Oncidium Orchids: Dancing Lady Orchids
Oncidium orchids, commonly known as “Dancing Lady Orchids,” are cherished for their petite, often brightly colored flowers that resemble dancing figures. Native to diverse habitats from rainforests to semi-desert regions in South America, Oncidiums are relatively easy to grow and can tolerate a range of light conditions from moderate to bright indirect light. They require regular watering but must be allowed to dry out slightly between waterings to prevent root rot.
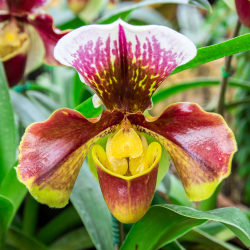
Paphiopedilum Orchids: Slipper Orchids
Paphiopedilum orchids, also known as “Slipper Orchids,” are distinctive for their slipper-shaped pouches and elegant foliage. They are found in Southeast Asia and parts of the Indian subcontinent, often growing on forest floors or rocky terrain. Paphiopedilums prefer low to moderate light levels and high humidity. They are more forgiving in terms of watering, as their roots are sensitive to overwatering. These orchids bloom sequentially from a single flower spike and can produce flowers that last for several months.
Growing Orchids Successfully at Home Successfully growing orchids at home requires understanding their specific needs regarding light, humidity, watering, and temperature. While each type of orchid has its preferences, most orchids benefit from bright, indirect light, consistent moisture (without waterlogged roots), and adequate air circulation. Choosing the right potting medium—typically a mix of bark, perlite, and sphagnum moss—is crucial for providing proper drainage and aeration.
With patience and attention to detail, orchid growing can become a deeply satisfying hobby that allows you to witness nature’s beauty firsthand in your own home. Happy gardening, and may your orchids flourish!