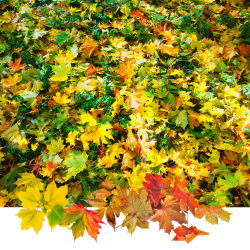
Autumn is your lawn’s favorite time of year! It’s the best time to treat your turf to a little extra maintenance, that will ensure a thick, green, healthy lawn next spring!
Remove the Leaves “Leave the leaves” may be an excellent idea for your perennial beds and the ecosystem in general, but not for your lawn! Leaves block light and trap moisture. Those soggy mats of leaves on your turf can lead to disease problems. So as leaves fall, rake them from lawns and add them to the compost bin or shred them and dig directly into your vegetable garden.
Aerate to Loosen the Soil Regular aeration prevents soil from becoming compacted and covered with a layer of thatch. Thatch blocks water, oxygen, and nutrients from reaching the soil. It’s a good idea to aerate your lawn BEFORE FERTILIZING, so the fertilizer will be able to reach the roots.
Apply Winter Fertilizer Green Thumb Winterizer should be applied in mid October. This slow-release fertilizer will feed continuously for the next sixteen weeks, giving grass roots plant sugars to protect roots from freezing over the winter, and enough energy to bounce back in the spring.
Get Rid of the Weeds In the autumn, weeds prepare for winter by sending energy and nutrients into their roots. It’s a good time to apply Weed Free Zone to kill these invasive weeds, roots and all. Make sure to remove weeds before they go to seed for the season, or you’ll see them again in the spring!
Grub Control No, the Japanese Beetles haven’t gone away — they’ve burrowed into your turf for the winter! Early Autumn is the prime time to apply a grub control before the weather turns colder and they burrow deeper. GrubGONE! is a bio-insecticide that is effective at controlling turf grubs without side effects of off-target damage to beneficial insects.
Continue Watering Continue to water as long as the temperatures remain above freezing, and always be sure to give your lawn a good watering before you drain your sprinkler systems for the year. While it’s true there is less evaporation at this time of year, natural moisture may not be enough to keep the grass roots hydrated and healthy going into the winter. Make sure your lawn continues to receive at least an inch of water a week.
Keep mowing Grass will continue to grow up until the first hard frost. If you put the mower away too soon and allow the grass to become too long, it will mat, which can make it susceptible to fungi like snow mold. In the autumn, aim to maintain an ideal height of 2 ½”-3.” This is long enough to protect the root system over the winter, but not long enough to encourage disease. Regular mowing is also an easy way to chop up those fallen leaves for a natural, soil-enhancing mulch.
Reseed and Repair The cooler temperatures of autumn make it an ideal time to thicken up existing turf. The soil is still warm, moisture doesn’t evaporate as quickly, nights are cooler, and the sun isn’t as hot during the day. This allows grass to grow more rapidly and gives it a chance to establish before cold weather arrives.
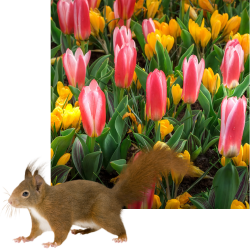
Are you planting a bulb buffet for squirrels each autumn? It can be frustrating to go through the work of planting all those beautiful flower bulbs only to discover them dug up and chewed a few days later.
Take heart! Many a gardener has had this experience, and a few have come up with some creative ways to solve the problem. Armed with these tips, you’ll be well on your way to a squirrel-proof spring garden. Let’s dive in!
Delay Your Planting Schedule The problem is bulb planting season coincides with squirrels-fattening-up-for-winter season, and that leads to hungry squirrels eating freshly planted flower bulbs! One solution can be to delay your planting time. The height of their feeding frenzy typically peaks in early fall, but it begins to wane by late October. By then, squirrels have already fattened up sufficiently and stored up their winter supplies.
In Colorado, it’s generally a good idea to wait until the weather cools in October before planting spring-flowering bulbs anyway. You can always purchase your bulbs when they first hit the garden center shelves in September, then keep them stored until the weather cools enough to safely put them in the ground.
Add Something They Don’t Like Are tulips and crocuses your favorite spring flowers? They’re a squirrel’s favorite too! To give your tulips & crocuses a fighting chance, try mixing in a few bulbs that will make squirrels turn up their noses and look for better smelling food elsewhere.
Try adding Allium bulbs to your spring display. Squirrels have an aversion to the scent of this member of the onion family! Planting these ornamental onions among your vulnerable spring bulbs can act as a natural deterrent. Try intermingling Allium with your tulips, crocuses, and other spring favorites. This not only adds an interesting floral visual element, but also helps shield your more delicate blooms.
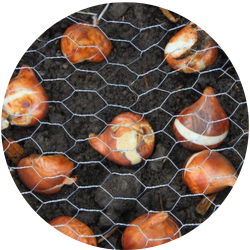
Create a Protective Barrier Before planting your bulbs, consider laying down a layer of chicken wire over the soil. This mesh barrier will deter squirrels from digging while still allowing your bulbs to grow through.
Make sure to firmly secure the edges of the chicken wire to prevent any curious critters from lifting it. This extra step ensures your bulbs stay safe and sound. Then cover the wire barrier and the bulbs with soil. The wire will make it difficult for squirrels to dig and encourage them to look elsewhere for an easier meal.
Try Squirrel Repellents There are several natural substances that squirrels find unappetizing. You can sprinkle crushed red pepper flakes, cayenne pepper, or a garlic-based repellent around your bulb beds.
There are also several ready-to-use squirrel repellents that use all-natural ingredients that you can try. They also repel through strong smells like cedarwood and garlic. Be persistent with all of these, as they’ll need to be reapplied after rain.
Conceal with Mulch Magic Applying a generous layer of mulch over your bulb beds serves two purposes. Firstly, it helps regulate soil temperature and moisture levels, creating an ideal environment for bulb growth. Secondly, it conceals the scent of the bulbs from prying squirrel noses! Choose Wisely: opt for a heavier mulch like wood chips or bark, which are more difficult for squirrels to move aside.
Remember, persistence is key when it comes to outsmarting hungry squirrels! By combining these tactics, you can create a more formidable defense against these crafty critters and ensure your spring flowering bulbs dazzle with lots of vibrant blooms.
We curate our patio furniture lines to offer what we feel is the finest outdoor furniture available. We don’t sell what we wouldn’t own ourselves! Here’s a quick rundown on our favorite patio furniture and why we love it.
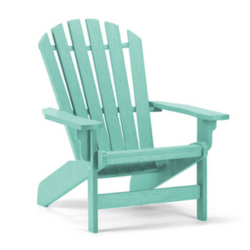
Breezesta
Material: Recycled Poly lumber
Why we love it: It’s environmentally friendly, sustainable, amazingly durable, maintenance free, and we love the color choices.
What is recycled poly lumber? Simply put, it’s recycled plastics. Every year thousands of HDPE (high density polyethylene) milk jugs and water bottles are rescued from America’s waste stream and recycled into sturdy poly lumber by Breezesta. These raw plastics are decontaminated, then formed into a rigid board material that’s mold & mildew resistant and guaranteed not to warp. The resulting finished product contains over 90% recycled plastic by weight. That’s eco-friendly!
Breezesta offers a variety of beautiful color choices, but the polywood color is not just a paint on the surface — it runs all the way through the lumber! Using a proprietary process, ultraviolet inhibitors and stabilizers are mixed in with the pigments as the polylumber is formed. So the rich colors cannot chip off with wear, and any scratches may easily be sanded out. The color is guaranteed not to fade for three years. The polylumber itself is covered by a limited lifetime warranty against cracking, splintering, chipping/peeling, rot and insect infestation.
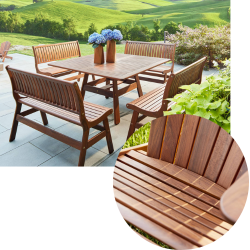
Jensen Outdoor
Material: Ipé Wood
Why we love it: Ipé is one of the densest woods in the world with a remarkable resilience and a rich, chocolate brown color. Sustainably sourced and grown.
Ipé (ee-pay) wood grows abundantly in the tropical Chiquitania Forest of Eastern Bolivia. Due to the unique dry climate there, trees grow very slowly, resulting in extremely strong, durable wood. Jensen’s commitment to sustainable growing and harvesting has earned them the distinction of being one of the first outdoor furniture manufacturers to receive an FSC (Forest Stewardship Council) certification.
Ipé timber is known for its amazing durability and resistance to weather, moisture, sun and wind, which makes it an ideal wood for quality outdoor furniture. Its remarkable resilience makes it resistant to damage from scuffing, cracking, and warping due to weather and wear. These beautiful pieces will stand the test of time.
The deep chocolate-brown grain may be allowed to naturally age to a silver patina or it can be brought back to “new” at any time with a wood oil. Mortise and tenon joinery maintain long-term strength, and fine-grain sanding techniques bring the timber to a glass-smooth finish.
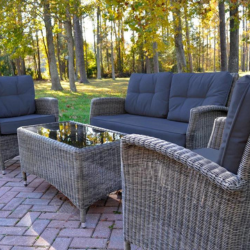
Kettler
Material: Polyethylene Wicker
Why we love it: Maintenance-free, all-weather wicker on aluminum powder-coated frames equals optimal strength and durability.
We love Kettler’s commitment to creating outdoor living comfort through high-quality materials, solid construction techniques, and outstanding durability in their furniture. Their indoor/outdoor wicker is intricately handwoven with a synthetic, maintenance-free, all-weather rattan over aluminum powder-coated frames. A UV rating of 2000 hours provides a high level of colorfastness combined with all-weather Sunbrella fabrics to withstand even the harshest elements. It’s wicker that can be enjoyed indoors or outdoors. The aluminum and wicker are both warranted for three years. Finally, an all-weather wicker!
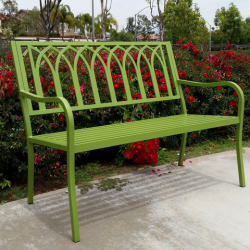
Innova
Material: Galvanized steel
Why we love it: Durable steel that’s hand welded and hand finished in contemporary styles and bright, cheery colors.
It’s easy to bring a bright pop of color to your garden with one of Innova’s contemporary styles. We love Innova’s commitment to blending superior construction and unique design. Made from galvanized steel and fully powder-coated for enhanced color retention and weather resistance. Hand welded and hand finished garden benches that make outdoor living both comfortable and beautiful.
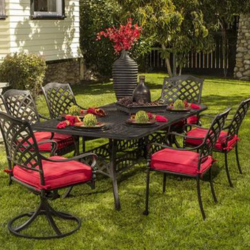
Hanamint
Material: Cast Aluminum
Why we love it: Classic designs that are comfortable and elegant combined with durability that will provide years of carefree enjoyment.
We love Hanamint for their commitment to providing quality furniture with durable finishes in timeless elegant designs! Their patio furniture is sandcast aluminum, which is noted for its durability and rust resistance. The process of sandcasting dates back thousands of years, and each piece is the result of numerous craftsmen working together to produce each handmade piece.
They are then finished with an 8-step polyester powder-coating process. This ensures the finish will stay beautiful year after year. Hanamint only uses Sunbrella fabrics for their cushions. That means they’re easy to clean and stay beautiful in all types of weather. If you’re looking for classic design, durability, and maintenance-free patio furniture, choose Hanamint!
Stop by and visit our outdoor living department! You’ll find quality furniture along with fire pits and lots of accessories that’ll make your outdoor rooms comfortable and beautiful year in and year out.
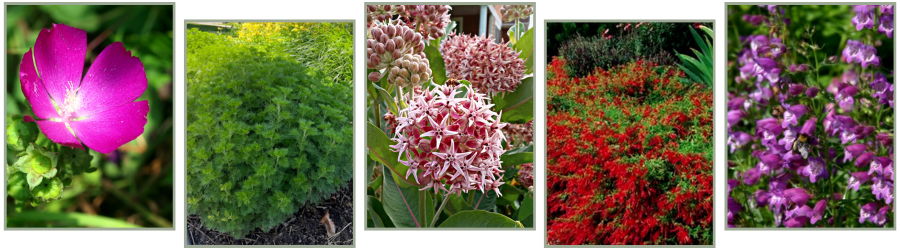
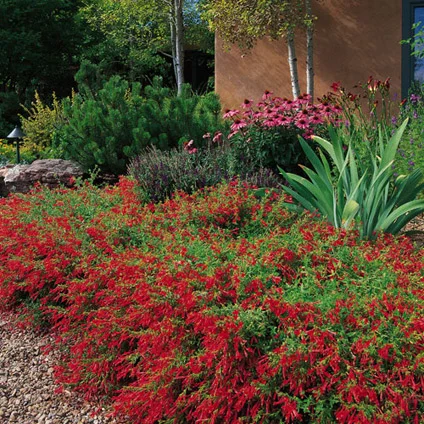
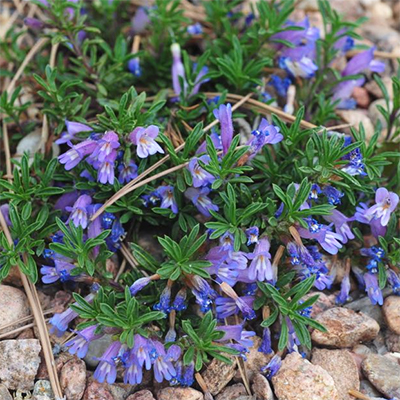
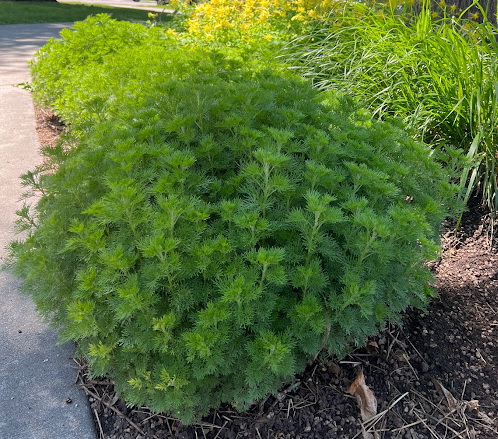
It’s the hottest topic for Colorado gardeners right now — waterwise gardening. How can we make the most of our landscape while using less water and supporting local pollinators at the same time? Choosing the right plant for the right location is always a recipe for success! Following are five of the best performing plants for our region.
Zauschneria Orange Carpet
(Epilobium canum ssp. garrettii) Height: 4″-6″ Width: 18″-24″ Sun requirements: full sun to partial sun USDA Hardiness: Zones 3-8
Rapidly spreading groundcover with masses of orange-scarlet flowers in summer. A selection made from seed collected in Idaho, this is the best form of California fuchsia for high altitude or cool climate gardens. To help establish new transplants, provide supplemental winter water for the first couple of years if winter conditions are dry. Needs full sun for best growth. Thrives in disturbed soils – aerate surrounding soil with push aerator or spading fork from time to time.
Bluemat Penstemon Waggon Wheel
(Penstemon caespitosus) Height: 1″-2″ Width: 12″-14″ Full Sun USDA Hardiness: Zones 4-7
Tiny, spoon-like leaves sprout on prostrate stems that grow into circular, evergreen mats, outfitting this plant’s name, Waggon Wheel Bluemat Penstemon. Centimeter-long tubular flowers glow blue to lavender throughout the foliage from early June to July. Native to Colorado and Wyoming mountains, it prefers well-drained soil, but is adaptable to clay loam conditions. It does not like to be over-watered, making it perfect for water-wise gardens!
Leprechaun Southernwood
(Artemisia abrotanum) Height: 24″-36″ Width: 24″-30″ Sun, Shade, Partial Sun USDA Hardiness: Zones 4-8
A compact selection of the ancient garden herb that forms a dense, symmetrical mound of whorled silver-green foliage. Plant en masse to create a low garden hedge suggestive of boxwood but heat-loving! Cut back in January to early spring when fully dormant. Tolerant of shady conditions as well as full sun.
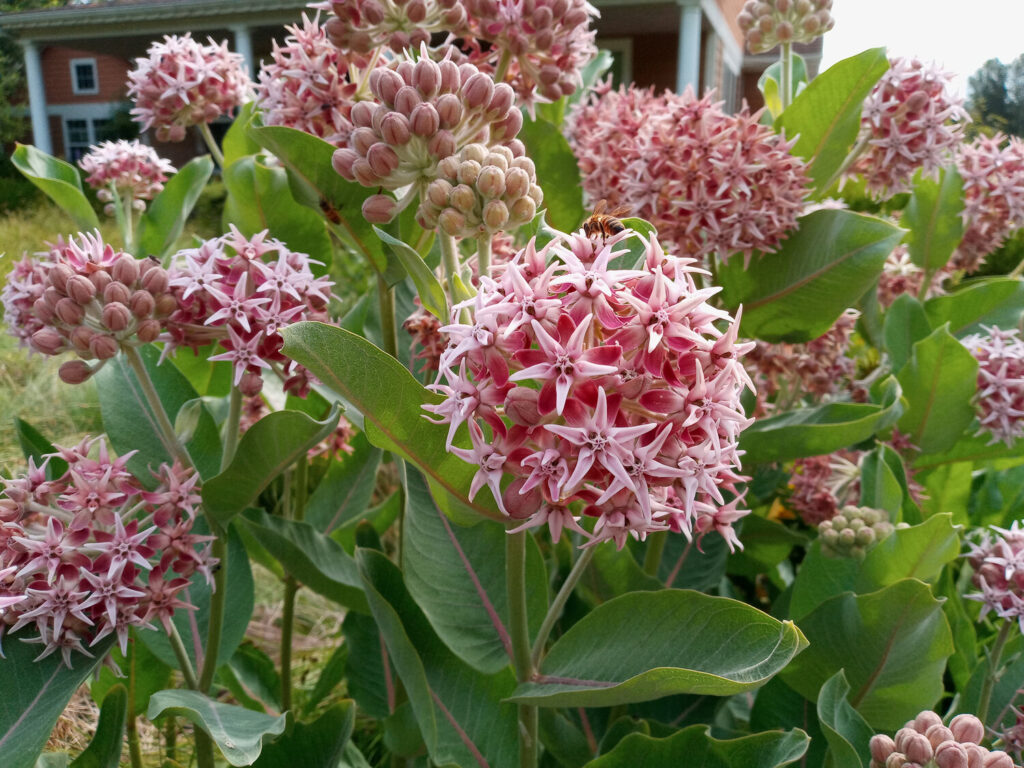
Showy Milkweed
(Asclepius speciosa) Height: 4-6 ft. Width: 4 ft. Full Sun USDA Hardiness: Zones 3-8
Showy milkweed is similar in form to common milkweed but less aggressive, making it more manageable in a garden setting. Spiky pink flowers atop thick upright stems bloom June through August. Monarch butterflies lay eggs exclusively on plants in the Asclepias genus. With this plant in your garden, you’re sure to see monarchs!
Poppy Mallow Winecups
(Callirhoe involucrata) Height: 4″-6″ Width: 24″-30″ Full Sun USDA Hardiness: Zones 4-9
Also known as simply “winecups.” A native wildflower that decorates the garden with a summer-long display of bright magenta-pink flowers. A sprawling grower, Callirhoe involucrata’s long branches spread out across the ground to create a colorful mat of flowers and foliage. This plant will cascade over a rock wall or will make a good rock garden plant. Blooms appear July through September.
We have plenty of different types of perennial plants for almost any landscape. You can use our plant finder reference tool to search for more water-wise plants. Once you have an idea of what kind of plants you’re looking for, come in and see us! Our experts are always happy to provide advice and answer any questions you may have.
With the arrival of summer comes an abundance of sunshine, warm temperatures, and maximum daylight hours. It’s definitely time to get outdoors and enjoy a little fun in the sun — garden fun, that is!
While working in your garden can be lots of fun, gardening has many practical benefits as well. From alleviating stress to weight loss to improved mental health, time spent in the garden gives back to us in so many wonderful ways.
Boost Your Vitamin D Intake Naturally After a long winter spent indoors, it’s positively blissful to get out in the sun and breathe fresh air again! One of the secrets that Coloradoans have known for years is that a little sunshine goes a long way towards improving your mood naturally.
What is relatively new knowledge is the fact that when exposed to the sun, your skin can manufacture its own Vitamin D. The role of Vitamin D (the sunshine vitamin) in keeping bones strong is already well-established. A Colorado summer will provide plenty of sunlight to boost the vitamin D levels in your body naturally.
Build Muscle & Lose the Winter Pounds Those seemingly endless garden tasks like digging, planting, weeding, watering, and mulching all keep you moving — and that’s good!
Here’s a fun fact: just thirty minutes of active gardening can burn up to 280 calories. You can banish weeds and pounds at the same time! Who needs a treadmill when you’ve got a garden?
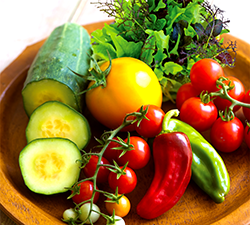
Improve Your Diet Effortlessly A natural extension of growing your own food is that often there is a change in your diet. After all, when you’re growing your own fruits and veggies, it goes without saying you’ll be eating what you grow!
The freshness and flavor of homegrown vegetables are what every gardener looks forward to. Fresh cucumbers, tomatoes, peppers, and corn are the precious rewards for all those hours spent toiling in the garden. Superior taste and quality are just the beginning though. Those humble fruits and veggies are jam-packed with valuable dietary fiber, and fiber intake is linked to lower incidence of cardiovascular disease and obesity. They are also a source of important vitamins and minerals.
Enjoy the Positive Effects on Your Mental Health Many people like to get outdoors and dig in the soil because it just makes them feel good. Nowadays, it’s a great way to unplug from the ever-present digital devices and destress naturally.
It’s easier to relax and let go of stress while performing repetitive tasks, and gardening provides a lot of repetitive tasks. Recent studies show that what’s good for the body is also good for the mind. Working outdoors in the garden releases “happy hormones” like dopamine and serotonin. These are hormones that make us feel good, while at the same time reducing the level of destructive stress hormones like cortisol. While all of those gardening chores may be tiring, they are naturally dissipating excess energy which helps us sleep better at night.
Passing it Forward to the Next Generation It goes without saying that all kids just naturally enjoy playing in the dirt! Gardening can indulge that desire in a productive way. Kids are thrilled with unexpected garden surprises like digging up a carrot, radish, or potato!
Involving them in the garden provides invaluable teachable moments in life as well. Planting something and watching it grow will naturally teach children a sense of responsibility. If their first gardening experiences are fun and successful, they’re likely to develop a green thumb that will stay with them all their lives. Research suggests that gardening encourages a lifetime of healthy habits too. Try growing this year’s Halloween pumpkins in the garden. Learning to love growing your own food is a gift that will keep giving back to them for a lifetime.
The Element of Fun George Bernard Shaw once famously said, “We don’t stop playing because we grow old, we grow old because we stop playing.”
Having fun is not just for kids! It’s important at every age — in fact, it’s a basic requirement for good health in general. So why not add a little fun to your garden? You can introduce an element of whimsy with a kinetic sculpture or a wind spinner. You might choose to add an enjoyable glow to summer evenings with colorful solar stakes, or just sit back and relax while watching birds at play in a birdbath.
Summer’s here, but it won’t last forever! Make it a point to get out into your garden each day, and enjoy some summer fun in your garden.
Your mountain garden can thrive if you start by choosing the right plants! These are plants that will tolerate the high-altitude conditions in your particular climate zone. Many trees, shrubs, perennials, and cool-season annuals grow well at higher elevations.
The Mountain Floral Palette Consider classics like columbine, delphinium, lupine, bleeding heart, shasta daisies, and gaillardia in your garden. Enduring favorites like peonies and colorful oriental poppies are the mainstays of many a mountain perennial garden — and for good reason: they are all plants that will thrive at elevation!
Mountain gardeners should select perennial varieties that bloom in early to mid-summer. Late bloomers (good at lower altitudes) will get caught by the early fall mountain freezes. Brown-eyed Susan, painted daisy, yarrow, sunflowers, and columbine can also be seeded or planted in gardens or natural areas.
Don’t overlook roses. Grafted roses may not be winter hardy over 6500′ and should be treated as an annual in the mountains. Look for roses grown on their own roots including miniature roses and Rugosa roses. The Canadian, Parkland, and Explorer series also do well. It is important to follow instructions on winterizing your roses by protecting canes and roots from cold temperatures.
For the Vegetable Garden Look for all of those cool-season veggies that grow so well at lower altitudes in the spring and fall. They’ll be happy all summer long in the cooler growing climate in the mountains! Vegetables like leafy greens and root vegetables are good choices, as are broccoli, cauliflower, Brussels sprouts and peas.
Shrubs That Will Shrug Off the Cold There are many shrubs that do well in a mountain landscape. The curly leaf mountain mahogany is a native evergreen and has a beautiful upright shape. It sports attractive seed heads in late summer. The tiny trumpet honeysuckle would make a nice addition to a mountain landscape. It offers showy, fragrant, reddish-pink trumpet-shaped flowers for many weeks in the summer.
One of our favorites is the serviceberry bush. It offers beautiful white flowers in the spring, followed by edible fruit (serviceberries) the service berry bush also provides fall color in shades of oranges and yellows. The red twig dogwood provides a showy red contrast against winter snow banks. It grows to a height of 3 feet with a spread of 3 feet.
The Apache plume is a native shrub with a white flowers similar to that of a rose. These are followed by feathery, rose colored seed tails. Planted against a dark background, the Apache plume’s white stems are striking. Often overlooked and many times hard to find, the Russian hawthorn is a small tree (or large shrub). The Russian hawthorn sports yellow to orange fall color and provides food for the birds in the winter. The beautiful cinnamon bark of the native river birch gives the tall shrub an interesting winter texture.
The lingonberry, an evergreen 4 to 8 inches high is rated to zone 2 and ideal for a part shade border. This shrub is self pollinating and its berries are great for jams, jellies, and sauces.
Wild Cranberry? Yes! This conversation piece grows to zone 3 and is evergreen. The wild cranberry has delicate foliage followed by edible berries in the fall.
Echter’s plant profile signage provides and elevation guide for most plants, and our nursery, perennials, and annuals experts will be happy to answer questions about the suitability of plants for a high-altitude garden.
Remember to harden your plants off before planting! It gives them the best possible chance to adjust to their new environment!
What are Microclimates? Knowing the importance of microclimates is essential for a garden that thrives at a high altitude. What are they? A microclimate is a small, but distinctly different climate within a larger area. These small areas may be a little warmer, cooler, wetter, or drier depending entirely on their location. Becoming aware of these small climate pockets helps mountain gardeners to choose and site plants more wisely.
Looking for warmer microclimates Gardens on south-facing slopes are warmer and drier than gardens on north-facing slopes of the same valley at the same elevation! So a garden planted in full sun on a southern-exposed slope will have a longer, warmer growing season than other exposures. Southern exposures are a great place for plants that need more heat to come into flower before early autumn frosts.
Things like structures, fences, large rocks, walls, and trees can all act to provide protective screening from harsh winds. Their thermal mass can raise nearby temperatures and create a warmer microclimate in those areas.
Becoming aware of cooler microclimates Plant growth is slowed by cool soil temperatures, which drive plant metabolism. When soil temps drop below 55 degrees, plants stop growing. North-facing areas and low spots on your property will naturally be cooler.
Look for any small dips and indentations on your property, which can create collections points for cold air. As a result, frost pockets may be more likely to form in those spots.
Walk through your property carefully looking for these microclimates. This will help you place your plants and shrubs where they will have a better chance at succeeding, and your mountain garden will thrive!
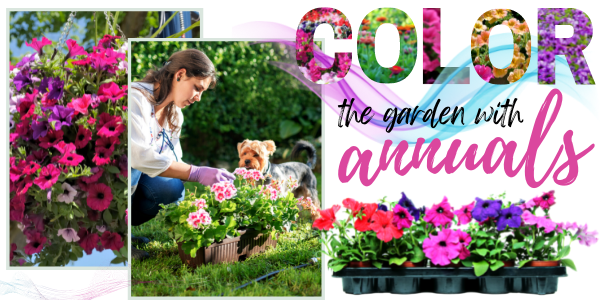
Nothing says summer like a garden filled with bright colorful flowers. So when the spring color show begins to fade and the threat of Jack Frost visiting the garden has passed, it’s time to have some fun and plug in the summer color with these popular single-season plants.
CHOOSING ANNUALS FOR YOUR GARDEN SPACE There are annuals that are sun lovers and annuals that prefer the shadier side of the garden. Don’t worry — there’s a palette of plants to choose from for either situation. When choosing your plants in the greenhouse, pay special attention to the amount of sunlight they will receive where you plant them.
Annuals that require full sun will need at least 6-8 hours of sunlight on their foliage each day, while part-sun plants would like 4-6 hours of sun daily. Those shade-loving plants will manage with dappled light through the leaves of trees, or less than 4 hours of sunlight daily. Note: partial & full-shade plants in Colorado must beprotected from mid-day through mid-afternoon sun.
Sun loving annuals include African Daisy, geraniums, petunias, calibrachoa, and bacopa. Shade loving annuals include impatiens, begonia, lobelia, vinca vine, fuchsia, and many more. There’s no shortage of choices for these single-season plants.
Think about the final height and width of the plants in your plan. Pay attention to the recommended spacing between the plants. This will help to avoid overcrowding as the plants grow, which can encourage pest and disease problems.
When choosing colors, consider the time of day you will enjoy your flower garden. Red tends to dull at twilight, while white or silver foliage will give a nice glow to your gardens in the evening.
PREPARING TO PLANT YOUR ANNUALS Remember to harden your plants off gradually before putting them out into the sunny garden all day. What does it mean to harden a plant off? It means to gradually expose a plant to the elements outdoors. Plants coming from the protected environment of a greenhouse need to get accustomed to drier air, brighter sunshine, and wind.
If they are set out suddenly, the change can damage them permanently. We recommend that you set them in a semi-protected area for a few days where they will get some exposure to the elements. Then, when they have been toughened somewhat, you can plant them into a fully-exposed site.
KEEP THE FLOWER POWER GOING ALL SUMMER Annuals are pretty prolific bloomers, but they need a little maintenance to keep them looking their best.
Fertilize them regularly with a blossom booster formulation. This is particularly important with annuals that are planted in containers, since container plantings are watered more often. This flushes out nutrients in the potting soil that will need to be replaced. Feed with Jack’s Blossom Booster fertilizer every couple of weeks to maintain the summer color show.
For in-ground annuals, mix flower fertilizer into the soil at planting time. Reapply as needed following directions on the package or use Blossom Booster regularly during the season.
Pinch your annuals back if they become leggy. You will lose a few flowers for a while, but be rewarded with many more later in the season. For some annuals deadheading (pinching off old flowers as they fade) will keep the beds looking beautiful and encourage more flowers. Most of the new varieties of annuals have so much flower power bred into them that they will continue to flower through the season with minimal maintenance. Calibrachoa is a good example.
Go ahead and get creative with your landscape this summer! Have some fun with your plant selections and design layout. Since annuals only last for one growing season, they make it easy to experiment with bright hues, textures, and forms. Whatever your style, mood, or color preference, you can easily create a garden that is uniquely “you” with the abundance of different annuals available.
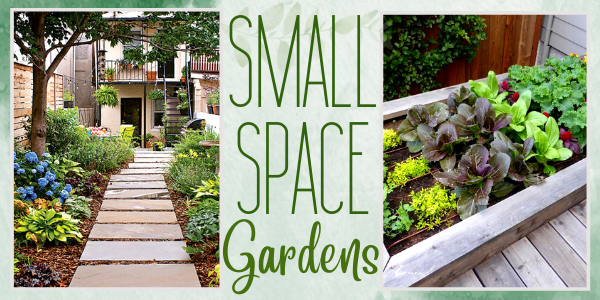
Do you dream of stepping out the back door in the summer to harvest your own homegrown vegetables for meals? Maybe you visualize long rows of spinach, corn, beans, and squash. Or maybe your dream is a flower garden with plenty of colors, textures, and fragrance. If you’ve got more dreams than space, that doesn’t mean you can’t have a garden! With a little know-how and some creative thinking, you can still harvest fresh homegrown veggies this summer and have some beautiful flower combinations too!
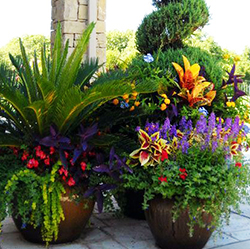
The Advantages of Container Gardening
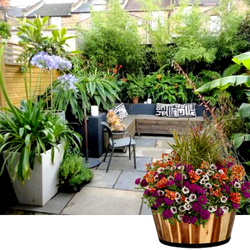
Simply put, container gardens are small, portable gardens that can be placed almost anywhere. They’re perfect for patios, porches, and balconies — even along stairs!
Even those who have larger garden areas can use containers to add a touch of color to areas where it may be difficult to grow flowers in the ground. You can easily add a few pots of flowers around your raised vegetable beds to attract more essential pollinators to your food crops too!
These small, portable gardens offer so many conveniences. For example, you might add a few containers of tomatoes, lettuces, or herbs to a handy sunny spot on the patio. It’ll save a trip out to the raised beds to harvest this summer’s salads.
Hate weeding? Container gardens are easily accessible, and they’ll require little, if any weeding! Summer storm or early/late season frosts threatening your garden? You can easily move your containers to a protected spot until the weather sorts itself out. Have problems with animals raiding your strawberry patch? Plant them in a hanging basket instead! With the exception of crops like larger pumpkins or corn, you’ll find you can grow nearly anything in a container!
Containers offer so much versatility to your gardening choices, and they’re easier to put together than you think! There are just a few steps to keep in mind, and then you’ll be up and growing in no time!
Step One – Determine the Available Sun in Your Space
Whether you’re gardening in a large space or a small one, every gardener starts in the same place — how much sun do have available? It’s important because that will determine what plants will grow best in the space you have.
You’ll want to keep sun requirements (especially for vegetables!) in mind. Full Sun means 6 or more hours of direct sun on your plants per day. Partial Sun/Partial Shade is 4-6 hours of direct sun per day, and Full Shade is less than 4 hours of direct sun a day.
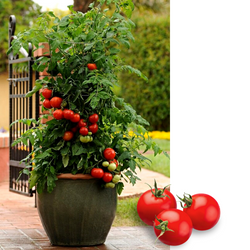
Most veggies require 6-8 hours of sun per day. Look for a space that meets that sun requirement. Tomatoes, peppers, and cucumbers all want plenty of summer sun to produce their best. Flowers like geraniums, petunias, and African daisies will thrive in a sunny space too.
If your garden space only receives partial sun (4-6 hours per day), choose from a different plant palette. Veggies like lettuce, radishes, kale, and Swiss chard will grow fine with partial sun or filtered sun conditions. Flowers such as fuchsia, begonias, impatiens, and coleus need protection from midday sun and will provide plenty of bold color in your shadier garden spaces.
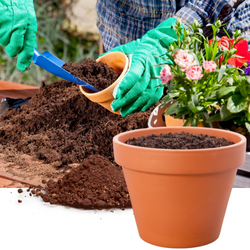
Step Two – Choose a Container
There is no shortage of choices for gardeners when it comes to containers for patios, decks, and porches. There are pots in everything from terracotta and recycled ocean plastics to glazed ceramics and even cloth! They’re all available in a seemingly unlimited number of colors and sizes.
Think about using vertical options like window boxes that fit over deck railings, or hanging baskets that will allow you to extend your gardening space upwards. Adding trellises to your pots will allow you to grow vining flowers and veggies in a smaller space.
Make sure whatever container you choose has drainage holes in the bottom, and will be large enough to provide adequate space for roots and soil, which will allow your container garden to grow and thrive.
Step Three – Add Soil
Good things grow from good soil! Like planting in a raised bed, container gardening requires a light, porous soil that will allow for good drainage.
We like Nature’s Yield Outdoor Planter Mix for containers. It’s blended with sphagnum peat moss for added moisture retention. To save on the amount of soil needed for a taller pot, use an Ups-A-Daisy insert (located in our indoor container area). It sits about 10-12″ from the top of the container, effectively raising the bottom of the pot. This reduces the weight of the containers, and helps ensure essential oxygen will reach to the lower plant roots.
Step Four – Choose Your Plants
Specialized varieties have been developed for small-space gardeners. When choosing plants look for terms like “compact,” “tidy plant habit,” or “short stature” on plant tags and seed pack descriptions.
We make it easy for you to choose plants. Our shade-loving plants are all on the north side of the greenhouse, while sun-lovers are on the south side. You can always find the sun requirement icons on our signs.
For a floral planter, follow the easy design “recipe” used by the pros: think thriller, filler, spiller. It makes plant choices easy! Choose a thriller, that is a tall plant such as dracaena spikes or maybe an ornamental grass. For your filler element, choose plants that mound like petunias, geraniums, or coleus. Finally, for something that “spills” out over the sides, think lobelia, sweet potato vine, or creeping Jenny.
For a container vegetable garden, tomatoes and peppers are favorites for patio pots, along with fresh herbs and salad veggies. Choose determinate varieties of tomatoes. They stay shorter. Add a trellis or stake to your container for growing peas, cucumbers, and mini pumpkins!
Step Five – Watering and FertilizingYour Container Garden
When gardening in pots, remember that potted plants need a little different care than their counterparts in the ground.
The soil dries out more rapidly in containers, so keep an eye on them and make sure they’re well watered and fertilized. We like Jack’s Classic Blossom Booster for floral pots and Jack’s All Purpose or Tomato Feed for veggie containers.
In the heat of summer, check your container gardens in the morning and the afternoon to see if they need watering. Adding a polymer like Soil Moist will help retain water in the soil.
Since container gardens are watered more often, fertilizer will get flushed from the soil faster than an in-ground garden. The nutrients your plants will need to grow and thrive should be added on a regular basis.
That’s it! In just a few simple steps you’ll be growing lush, vibrant container gardens of your own. A garden doesn’t have to cover a large area to be beautiful and enjoyable. It’s just a matter of making the best use of the space you have. Whether you decide to plant a few fresh veggies on the patio or create an abundant floral display for the front porch, get your hands in the soil and have fun with gardening in containers this summer!
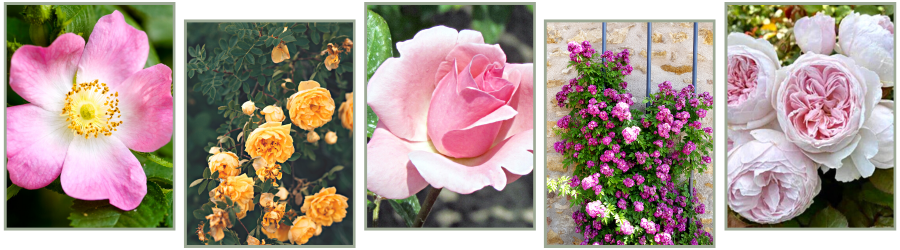
It’s easy to be overwhelmed by the selection of roses in our rose house! So many beautiful blooms in a seemingly endless variety of sizes, shapes, and colors. These classic garden staples now number over 300 species and several thousand varieties! How can you begin to narrow down which rose will the best one for your garden?
Most rose specialists would divide them into three basic categories: Old Garden Roses, Wild Roses and Modern Garden Roses. Each of these categories has their advantages and drawbacks, not to mention countless gorgeous varieties to choose from.
Old Garden Roses These are the predecessors of today’s hybridized roses. Often referred to as “antique” or “heirloom”, old garden roses have been around since before 1867. They’re known for their strong fragrance, hardiness, and resistance to disease. Unlike more modern roses, these only bloom once a year. They remain popular today though. The Queen Elizabeth rose is one of the most beloved vintage roses grown today and graces many a rose garden.
Wild Roses These are the original species of roses that grow in the wild. These lack the cross-breeding and hybridization of modern varieties, and can be recognized by their single, five-petal blooms. Most true wild roses are pink! White or yellow wild roses are quite rare.
Modern Garden Roses These are roses bred after 1867. Unlike the Old Garden Roses, they are not as fragrant, hardy, or disease-resistant. However, modern roses offer larger blooms and will bloom continuously throughout the season. Cross-breeding and hybridization are common and produce an abundance of colors, scents, and sizes.
There are many different types of roses within these three basic categories. Stroll through our rose house and you’ll see hybrid tea roses, grandiflora, floribunda, miniature, climbing roses, and shrub roses, just to name a few. Each can have a place in your garden. Spend some time talking with our rose experts. They can help you choose just the right rose for the right location!